Make a SSR Framework on Your Own: React & Node SSR Tutorial
In today's front-end development world, SSR (Server-Side Rendering) has become a popular topic. Many companies consider adopting SSR during technical upgrades to improve website performance. But as a developer, do you really understand the essence of SSR? What value does it bring? And how can we build a basic SSR framework?
Let’s explore these questions through a simple example and uncover the mystery of SSR.
const http = require('http');

const server = http.createServer((req, res) => {
  res.writeHead(200, { 'Content-Type': 'text/html' });

  res.end(`
    <html>
      <head>
        <title>ssr</title>
      </head>
      <body>
        <div id="root">ssr</div>
      </body>
    </html>
  `);
});

server.listen(3001, () => {
  console.log('listen on port 3000');
});
If you visit localhost:3000/, you'll see a simple page – this is the most basic implementation of SSR. In fact, SSR is not a new concept. During the golden age of PHP, all web pages were rendered on the server. Modern Node.js template engines, such as EJS and Pug, also work on the same principle.
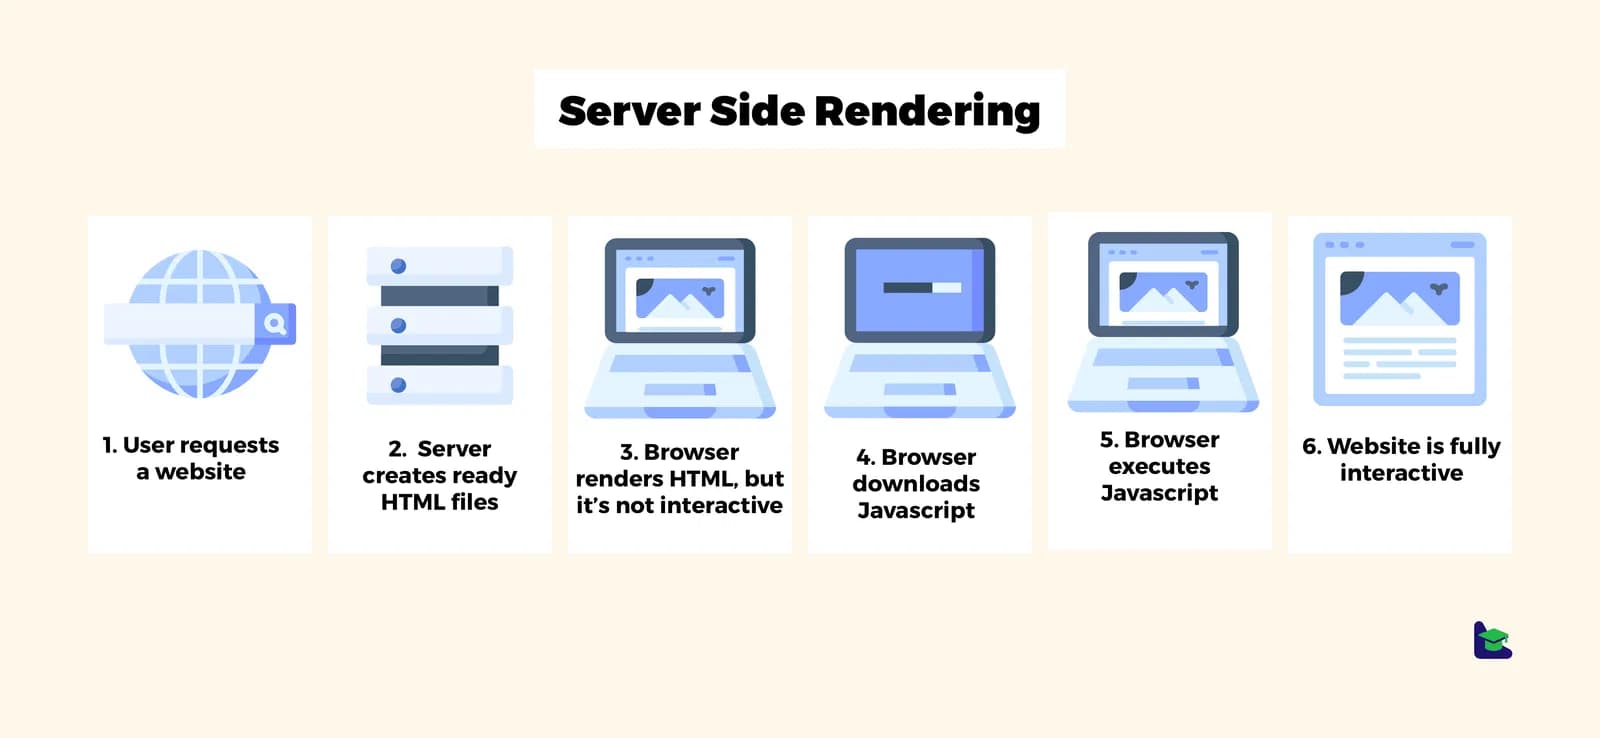
The core idea of SSR is simple: the server is responsible for assembling the HTML string, and the browser only needs to parse and display it.
So, how does client-side rendering (CSR) work? We can explore this by creating a React project using create-react-app. If you look at the generated page structure, you'll notice an interesting phenomenon: the page initially contains only an empty node with the id of root, and all content is gradually rendered after JavaScript is executed.
We won't cover these in the article; you'll need to do them on your own.
This reveals the fundamental difference between SSR and CSR:
- SSR: The page content is ready on the server side.
- CSR: The page content is dynamically generated on the browser side.
Given that CSR can already handle basic rendering, why do we still need SSR? This is because CSR has two significant drawbacks:
- Slow first-page load: The browser needs to wait for JavaScript to load and execute before rendering the content, which can lead to noticeable white screen times.
- Poor SEO performance: Search engine crawlers mainly index HTML content, and the initial HTML of CSR pages is almost empty, making it difficult for search engines to discover the content.
SSR was introduced to address these issues. It renders the HTML on the server during the initial load, while also fetching the same CSR code from the backend. Once it's received, it "hydrates" on the frontend, ensuring both a better user experience and improved SEO performance.
The previous example was too simple, so let's start building a real SSR framework based on React.
One of React's strengths is its ability to support isomorphic rendering (also known as universal rendering). In the front-end, React generates a Fiber Tree (an advanced version of the virtual DOM). On the server side, we can use react-dom's renderToString method to convert components into an HTML string.
Let’s build this project using TypeScript.
First, install the required dependencies:
pnpm install @types/node @types/react-dom @types/react -D
pnpm install react-dom@18 react@18Remember, the core of SSR is server-side rendering. When a user visits http://127.0.0.1:3000/, the server should return the pre-rendered HTML.
Here’s how to set up the server:
// server/app.tsx
import { createServer } from "http";
import { App } from "../client/App";
import { renderToString } from "react-dom/server";
import { resolve } from "path";
import { readFile } from "fs/promises";

const server = createServer(async (req, res) => {
  if (req.url === "/") {
    res.writeHead(200, { "Content-Type": "text/html" });

    const HTMLContent = `
      <!DOCTYPE html>
      <html lang="en">
        <head>
          <meta charset="UTF-8" />
          <meta name="viewport" content="width=device-width, initial-scale=1.0" />
          <title>Document</title>
        </head>
        <body>
          <div id="root">${renderToString(App())}</div>
        </body>
      </html>
      `;

    res.end(HTMLContent);
  } else {
    res.writeHead(404, { "Content-Type": "text/plain" });
    res.end("Not Found\n");
  }
});

server.listen(3000, () => {
  console.log("Server running at http://127.0.0.1:3000/");
});Now, let's create the React components for the client-side:
// client/App.tsx
import { Counter } from "./component/Counter";

export function App() {
  return (
    <>
      <Counter />
      <main>hello SSR</main>
    </>
  );
}
// component/Counter.tsx
import { useState } from "react";
export function Counter() {
const [count, setCount] = useState(0);
const increment = () => {
setCount((prevCount) => prevCount + 1);
};
const decrement = () => {
setCount((prevCount) => prevCount - 1);
};
const reset = () => {
setCount(0);
};
return (
<div>
<h1>{count}</h1>
<button onClick={decrement}>-</button>
<button onClick={increment}>+</button>
<button onClick={reset}>Reset</button>
</div>
);
}To run the project, we can use the tsx tool based on esbuild, which allows us to directly execute TypeScript files:
pnpm install tsx -g
tsx watch server/app.tsx
After navigating to http://127.0.0.1:3000/, you’ll see the following HTML output:
<!DOCTYPE html>
<html lang="en">
  <head>
    <meta charset="UTF-8" />
    <meta name="viewport" content="width=device-width, initial-scale=1.0" />
    <title>Document</title>
  </head>
  <body>
    <div id="root"><div><h1>0</h1><button>-</button><button>+</button><button>Reset</button></div><main>hello SSR</main></div>
  </body>
</html>
At this point, we’ve completed the first step of SSR! However, the page is still static HTML. Although we defined event handlers like increment, decrement, etc., the renderToString method only generates the HTML structure and doesn't include the interaction logic.
To make the page interactive, we need to manually inject JavaScript code into the HTML. Let's move on to that next.
We have successfully implemented server-side rendering, but users still can't interact with the page. To make the buttons responsive again, we need to inject client-side JavaScript into the HTML returned by the server, just like in a traditional CSR project.
First, update the server code to support loading client-side JavaScript files:
import { createServer } from "http";
import { App } from "../client/App";
import { renderToString } from "react-dom/server";
import { resolve } from "path";
import { readFile } from "fs/promises";

const server = createServer(async (req, res) => {
  if (req.url === "/") {
    res.writeHead(200, { "Content-Type": "text/html" });

    const HTMLContent = `
      <!DOCTYPE html>
      <html lang="en">
        <head>
          <meta charset="UTF-8" />
          <meta name="viewport" content="width=device-width, initial-scale=1.0" />
          <title>Document</title>
        </head>
        <body>
          <div id="root">${renderToString(App())}</div>
          <script src="index.js"></script>
        </body>
      </html>
      `;

    res.end(HTMLContent);
  } else if ((req.url = "/index.js")) {
    const data = await readFile(resolve(__dirname, "../dist/index.js"));
    res.end(data);
  } else {
    res.writeHead(404, { "Content-Type": "text/plain" });
    res.end("Not Found\n");
  }
});

server.listen(3000, () => {
  console.log("Server running at http://127.0.0.1:3000/");
});
In this step, we added a <script src="index.js"></script> tag. When the browser encounters this, it will request http://127.0.0.1/index.js. Therefore, the server needs to serve the file and return the bundled JavaScript file.
Now, let's create the client entry file to enable hydration:
// client/index.ts
import { hydrateRoot } from "react-dom/client";
import { App } from "./App";

hydrateRoot(document.querySelector("#root")!, App());
The role of this entry file is simple:
- Locate the DOM element with the
id="root". - Hydrate the existing DOM structure with the
Appcomponent.
To turn these TypeScript files into browser-executable JavaScript, we need to configure webpack:
First, install the required dependencies:
# Install webpack-related dependencies
pnpm install webpack webpack-cli webpack-merge @types/webpack -D

# Install Babel-related dependencies
pnpm install babel-loader @babel/register @babel/preset-typescript @babel/preset-react @babel/preset-env @babel/core -D// webpack.base.ts
import { type Configuration } from "webpack";
export const BaseConfig: Configuration = {
watch: true,
resolve: { extensions: [".ts", ".tsx"] },
module: {
rules: [
{
test: /\.(ts|tsx)$/,
loader: "babel-loader",
exclude: /node_modules/,
options: {
presets: [
["@babel/preset-react", { runtime: "automatic" }],
["@babel/preset-env", { targets: { browsers: ["last 2 versions"] } }],
"@babel/preset-typescript",
],
},
},
],
},
};This configuration handles the loading and transpiling of TypeScript and React files.
// webpack.client.ts
import * as path from "path";
import * as webpack from "webpack";
import { merge } from "webpack-merge";
import { BaseConfig } from "./webpack.base";

const clientConfig: webpack.Configuration = {
  mode: "development",
  entry: "./client/index.ts",
  output: {
    filename: "index.js",
    path: path.resolve(__dirname, "dist"),
  },
};

export default merge(BaseConfig, clientConfig);Run webpack to bundle the code:
npx webpack -c webpack.client.tsThis will start a webpack service that watches for changes in the App component and its children, continuously updating the bundled code in dist/index.js. The server will serve the latest client-side code to the browser.
Now, when we visit the browser, we’ll notice that the buttons are interactive again. Clicking the plus button will increase the number, confirming that hydration is working properly.
By injecting the JavaScript and hydrating the page, we’ve made the server-rendered content interactive, combining SSR for the initial load with CSR for subsequent updates.
Although the compilation process works as expected, your code editor might display the warning "React is not defined" in React components. This happens because when using JSX syntax, you must import React. Otherwise, after Babel converts JSX into React.createElement, this code may not function correctly due to the absence of React.
However, since we've already configured Babel to automatically inject React via the following setting:
[
  "@babel/preset-react",
  {
    "runtime": "automatic"
  }
]
Manually importing React is not necessary. The issue here is that TypeScript doesn't know about this automatic injection. To fix this, we need to adjust the tsconfig.json to inform the TypeScript server of this setting.
Here's how to configure tsconfig.json:
// tsconfig.json
{
  "compilerOptions": {
    "esModuleInterop": true,
    "allowSyntheticDefaultImports": true,
    "jsx": "react-jsx",
    "module": "esnext",
    "target": "es6",
    "moduleResolution": "node"
  },
  "exclude": ["node_modules"]
}
The "jsx": "react-jsx" setting tells TypeScript that React is automatically injected, which will prevent the editor from showing errors related to the missing React import.
At this point, your React SSR development environment is set up, and you should have two terminals running: one monitoring the server-side code and the other running the client-side code.
- The server-side code doesn't need to be bundled by Webpack, making it more efficient since it runs directly in memory. However, you could choose to create a
webpack.server.tsor bundle theApp.tsxcode separately, with the only difference being the server and client entry points.
Although this article covers the basics of SSR, the exploration of SSR is far from over. Let's consider two deeper questions:
- How do we implement routing on the server side to ensure the correct HTML is returned for different paths, such as
/homeor/marketing? - The client-side code also needs to be split accordingly to enable on-demand loading.
- We can consider using code splitting strategies to optimize performance.
- When server-rendered components require data fetching, how can we ensure that the server and client render the same result without performance overhead from "duplicate fetching"?
- One approach is to fetch the data server-side and inject it into the page state so the client can directly use it.
- Another approach is to use shared state management to ensure consistency between server-side and client-side data.
These challenges have led to the development of modern SSR frameworks like Next.js and Remix, which offer more efficient solutions to these problems.