SSH: The Secure Communication Backbone
In today's fast-changing internet world, we often need to connect different devices.
Whether managing servers from afar or moving important files, keeping the connection safe and reliable is very important.
But early network communication had big security holes. This is why the SSH protocol was created.
Back in the 1980s and 1990s, Telnet was the main way to log in to computers remotely. It was very helpful for system managers and developers.
With Telnet, users could run commands on a remote machine as if they were sitting right in front of it.
But this convenience came with a big security risk. Telnet's biggest flaw was plain text transmission. This means usernames, passwords, and all commands were sent over the network as simple, unencrypted text.
It was like writing your password on a postcard—anyone who handled it could read it easily.
Even worse, Telnet was open to "man-in-the-middle attacks." An attacker could secretly intercept the communication. They could not only steal information but also change the messages being sent. These security flaws are unacceptable today, as cybersecurity awareness becomes increasingly important.
In 1995, a Finnish computer scientist named Tatu Ylönen saw this security problem and created the new SSH (Secure Shell) protocol. The key innovation of SSH was that it created an encrypted tunnel. This ensured that even if data was intercepted, attackers could not read it.
The SSH protocol was quickly accepted by the industry. Using modern encryption, it protected against threats like man-in-the-middle attacks, DNS spoofing, and IP spoofing. Just as importantly, SSH provided strong ways to verify the identity of the person connecting.
It is also important that SSH balanced security with speed. Its built-in data compression helped use bandwidth efficiently, making a good balance between safety and performance.
The SSH protocol itself has also gotten better over time:
- SSH-1: The first version. It fixed the big security problems of its time, but later, some weaknesses were found as encryption technology improved.
- SSH-2: This is the version everyone uses now. It uses stronger encryption and better security. Compared to SSH-1, SSH-2 was redesigned from the ground up, making it more secure and able to do more things.
Today, SSH is the first choice for remote server management, secure file transfer, and port forwarding.
SSH is an essential tool for modern system administration. Its main job is to create secure remote connections. Let's look at how to use this powerful tool step by step.
Before using SSH, you need to make sure your system has the right software:
- Linux/macOS Users: Usually come with the OpenSSH client already installed. You can check by typing
sshin the terminal. - Windows Users:
- Newer versions (Win10/11) can add the OpenSSH client in "Optional Features."
- The common way is to use a program with a window, like PuTTY.
- Server Side: Almost all UNIX-like systems (like Linux and BSD) come with the SSH service pre-installed.
The most basic command is very simple:
ssh username@host_addressReal-world example:
ssh admin@203.0.113.45Or using a domain name:
ssh developer@example.comYour First Connection:
-
The system will ask you to confirm the remote host's identity, showing a fingerprint like this:
The authenticity of host 'example.com (203.0.113.45)' can't be established.
RSA key fingerprint is SHA256:nThbg6kXUpJWGl7E1IGOCspRomTxdCARLviKw6E5SY8.
This happens because your computer has never connected to this server before. It can't be sure the server is the real one and not a fake.
The
SHA256:nThbg6kXUpJW...is the server's unique ID, like a fingerprint.In short: Your computer says: "I've never talked to 'example.com' before. It showed me this ID. Should I trust it and remember it for next time?"
-
Type
yesto confirm. The host's key will be saved in a file called~/.ssh/known_hosts. -
Next, you will be asked to type the password for that user.
SSH gives you two main ways to transfer files:
Using SCP (Secure Copy)
# Send a file to the server
scp local_file.txt user@example.com:/remote/directory/

# Get a file from the server
scp user@example.com:/remote/file.txt /local/path/

# Copy a whole folder
scp -r local_folder user@example.com:/remote/path/
Using SFTP (SSH File Transfer Protocol)
sftp user@example.comAfter you connect, you can use commands similar to FTP:
putSend a filegetDownload a filelsSee files on the remote machinellsSee files on your local machinecdChange folder on the remote machinelcdChange folder on your local machine
SSH's port forwarding is like a "magic tunnel" for network traffic. Common uses:
Local Port Forwarding (-L)
ssh -L local_port:target_address:target_port username@jump_hostExample: Accessing a company database through a jump server
ssh -L 3306:db.internal:3306 employee@gateway.company.comNow, if you connect to your own computer's port 3306, it will connect to the internal database.
Remote Port Forwarding (-R)
ssh -R remote_port:local_service_address:local_port username@remote_serverThis is useful for letting someone on the internet access a service running on your own computer.
After you connect successfully, you get a remote terminal where you can run system commands:
# Check system info
uname -a
cat /etc/os-release

# Check system status
top
htop  # A better viewer (may need install)
nmon  # A professional system tool

# Manage services
Important Notes:
- When you use
sudo, you need to type your current user's password (not the root password). - For commands that take a long time, use
screenortmuxto avoid losing the connection if it drops. - Before running a dangerous command, test it first to see what it does.
By learning these basic uses, you can handle most remote management tasks. As you practice more, you will find SSH can do even more, like complex multi-hop connections.
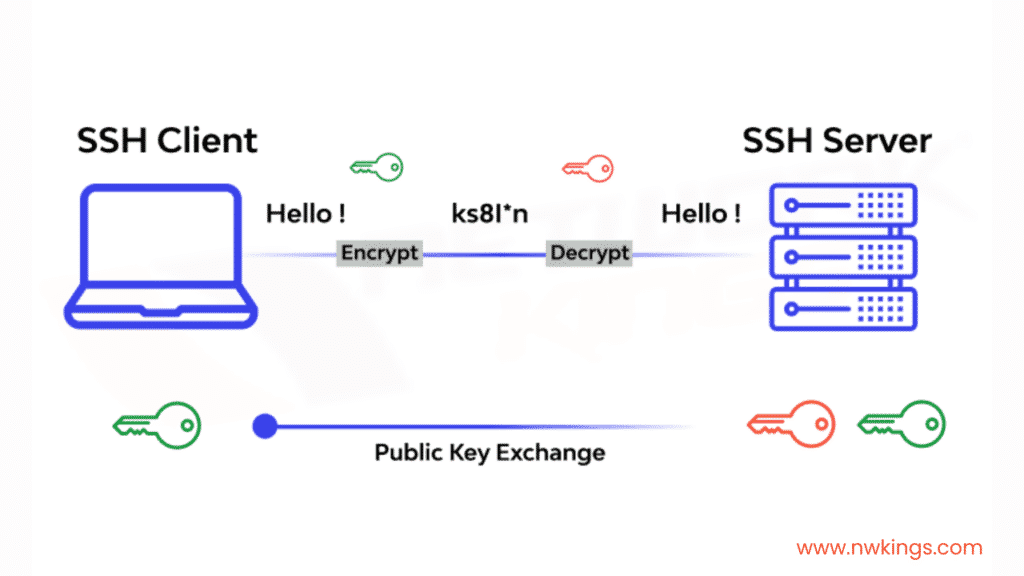
Although we just type simple commands to start an SSH connection, the technology behind it is quite clever. Let’s uncover how SSH secure communication works in simple terms.
SSH uses a set of encryption methods that work together to keep the connection safe. These three layers each have a role, forming a strong security net.
Symmetric Encryption – The Fast Data Safe
Think of symmetric encryption like a lockbox that needs a key. Both sides use the same key to lock and unlock the data. When you type a command in an SSH session, the data is scrambled by a symmetric encryption method (like AES-256). Only the server with the same key can unscramble and read it.
This method is very fast, good for encrypting lots of data in real time. SSH creates a unique symmetric key at the start of each session. This key works only for that session. Even if it gets cracked, other sessions stay safe.
Asymmetric Encryption – The Secure Key Courier
If symmetric encryption is the lockbox, asymmetric encryption is the safe messenger that delivers the key. It uses a pair of mathematically linked keys: a public key and a private key.
The public key can be shared openly, like your email address. The private key must be kept secret, like the key to your mailbox. Data locked with the public key can only be unlocked with the matching private key, and vice versa. During the SSH handshake, asymmetric encryption is used to safely share the symmetric key, solving the problem of key exchange.
Message Authentication Code – The Tamper-Proof Seal
Even if data is encrypted, an attacker might try to change it during transfer. The Message Authentication Code (MAC) acts like a “digital seal” to stop this.
Before sending each data packet, a unique “fingerprint” is calculated. The receiver calculates it again and checks if it matches. If the data was changed along the way, the fingerprint won’t match, and the connection stops immediately. It’s like putting an anti-fake label on each packet to ensure data integrity.
SSH offers several ways to authenticate, each with its own use cases and security features.
Password Authentication – The Classic Door Code
This is the most straightforward method, like typing a door entry code:
ssh username@hostname
# The system asks: username@hostname's password:
It’s convenient, but passwords can be guessed by brute force attacks. So in real-world setups, it’s often used with extra security like login attempt limits and strong password rules.
Public Key Authentication – The Secure Digital Key
This method is safer and more convenient. Let’s look at how it works step by step:
Generate a key pair:
ssh-keygen -t ed25519 -a 100 -C "your_email@example.com"-t ed25519chooses the EdDSA algorithm (safer and faster)-a 100sets the number of key derivation rounds, making it harder to crack- The private key is saved in
~/.ssh/id_ed25519and must have 600 permissions - The public key is saved in
~/.ssh/id_ed25519.puband can be shared freely
Copy the public key to the server:
ssh-copy-id -i ~/.ssh/id_ed25519.pub username@hostnameThis command automatically adds your public key to the server’s ~/.ssh/authorized_keys file.
How the authentication works:
- The client says it wants to use public key authentication
- The server creates a random challenge
- The ...